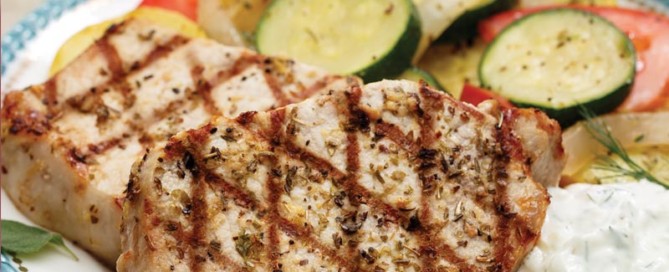
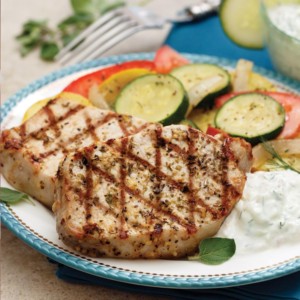
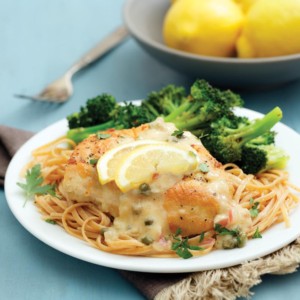
Everyday Meals

Chicken Piccata

Mona’s Family Favorites: I love to make this recipe when entertaining and it always gets a “Wow!” from friends and family. Here’s the culinary trick, timing! Lemon juice and chicken broth are simmered together before whisking in rich butter off the heat to emulsify or thicken the sauce just before serving. We found that 2½ tablespoons of butter was enough to thicken the liquid and make this sauce delicious. I usually serve it over pasta or on a bed of sautéed spinach.

5.0 from 1 reviews
Chicken Piccata
 
Prep time
Cook time
Total time
 
Author:
Recipe type: Everyday Meals
Makes: 4 Dinner portions
Ingredients
  • 4 (6-ounce) boneless, skinless chicken breasts, pounded thin
  • Salt and pepper
  • ½ cup all-purpose flour
  • 2 tablespoons olive oil
  • 2 tablespoons finely diced red onion
  • ½ cup chicken stock
  • Juice of 1 large lemon
  • 2 tablespoons capers, drained
  • 2 ½ tablespoons butter
  • 2 tablespoons chopped fresh parsley
Directions
  1. Season both sides of the chicken breasts with salt and pepper. Place the flour on a wide plate, adding a pinch of salt and pepper.
  2. Dredge the chicken in the seasoned flour, pressing down to coat on all sides before shaking off any excess.
  3. Add olive oil to a large skillet over medium-high heat, and heat until oil thins and coats the skillet.
  4. Place the dredged chicken into the skillet, and cook for 4–5 minutes on each side, until browned. Remove the skillet from the heat, and transfer the chicken to a plate.
  5. Add the red onion to the skillet, and return to the heat, just until sizzling. Deglaze the pan with chicken stock and lemon juice, scraping any browned chicken from the bottom. Bring the sauce to a simmer, and let reduce to about half.
  6. Add the capers to the sauce before returning the chicken to the pan to cook for an additional 2 minutes.
  7. Remove the skillet from the heat, and stir in butter to thicken the sauce. Serve garnished with chopped fresh parsley.
Serving size: ¼ breast with sauce Calories: 100

 [/fusion_builder_column][/fusion_builder_row][/fusion_builder_container]

Grilled Greek Pork Chops

Bob’s Farm to Table: Inspired by the traditional pork souvlaki found in Greek diners, we marinate lean boneless pork chops in a medley of Mediterranean seasonings. We love the smoky char that grilling lends to these chops, but they can also be pan-fried over high heat in the same amount of time. Top the chops with a dollop of Tzatziki Sauce for a tangy, creamy finish.

Grilled Greek Pork Chops
 
Prep time
Cook time
Total time
 
Author:
Recipe type: Everyday Meals
Makes: 4 DInner portions
Ingredients
  • 4 (4-ounce) boneless, center-cut pork loin chops
  • 1 tablespoon olive oil
  • 1 tablespoon lemon juice
  • ½ teaspoon lemon zest
  • 1 ½ teaspoons dried oregano
  • 1 ½ teaspoons minced garlic
  • ¼ teaspoon onion powder
  • ¼ teaspoon salt
  • ¼ teaspoon pepper
Directions
  1. Add pork chops and all the remaining ingredients to a large food storage bag or mixing bowl, and toss to thoroughly coat chops. Marinate for 1 hour in the refrigerator.
  2. Preheat a grill or grill pan to high heat.
  3. Shake excess marinade from chops, and grill for 4–5 minutes on each side, just until the internal temperature reaches 145°F, or slicing into the thickest chop reveals meat that is opaque with juices that run clear.
  4. Let rest for 5 minutes before serving topped with Tzatziki Sauce (page 247), if desired.


HELPFUL TIP: Though the usual rule of thumb is that you can leave meat in a marinade overnight and get even better results, that is not recommended with a marinade with this much acid (from lemon juice). An hour or two is all you need; after that, the lemon juice will begin to cook the outside of the pork.
Serving size: ½ pork chop Calories: 100

 [/fusion_builder_column][/fusion_builder_row][/fusion_builder_container]

Oven-Fried Chicken

Bob’s Farm to Table: We were able to create moist and tender chicken with a satisfying crunchy crust without a single drop of oil! The secret is using a thick buttermilk marinade and a substantial coating of ground cornflakes and flour. This recipe can be prepared three ways: as 100 calorie chicken tenders, traditional fried chicken, or as oven-fried chicken without the skin for even lower calories.

Oven-Fried Chicken
 
Prep time
Total time
 
Author:
Recipe type: Everyday Meals
Makes: 14 chicken tenders or 8 pieces of fried chicken
Ingredients
  • Chicken:
  • 2 pounds chicken tenderloins or
  • 1 whole chicken (3 ½–4 pounds), split into 8 pieces (with or without skin)
  • Breading:
  • ¾ cup low-fat buttermilk
  • 1 tablespoon hot pepper sauce (Tabasco)
  • 1 ¼ teaspoons salt, divided
  • 1 teaspoon pepper, divided
  • ½ teaspoon dried thyme
  • ½ teaspoon paprika
  • ¼ teaspoon garlic powder
  • ¼ teaspoon onion powder
  • 3 cups cornflakes
  • ¾ cup flour
Directions
  1. Place the chicken in a large bowl or food storage container. Add the buttermilk, hot pepper sauce, ½ teaspoon salt, ½ teaspoon pepper, thyme, paprika, garlic powder, and onion powder, and toss to fully coat the chicken. Cover, and refrigerate for at least 2 hours to marinate.
  2. Preheat the oven to 425°F, and place a rack in a roasting pan for the crispiest results.
  3. In a food processor, pulse the cornflakes until finely ground. Transfer to a wide bowl; combine with flour and the remaining ¾ teaspoon salt and ½ teaspoon pepper.
  4. Flip the marinated chicken in the buttermilk to ensure that it is well coated before pressing each piece into the cornflake mixture, breading on all sides. Place on the rack inside the roasting pan. For crispier chicken, lightly spray the breading with nonstick cooking spray.
  5. FOR CHICKEN TENDERS: Bake for 15 minutes, flipping halfway through. Check for doneness by slicing into the thickest tender to reveal no pink.
  6. FOR WHOLE CHICKEN PIECES: Bake for 20 minutes, and flip. Reduce heat to 375°F, and continue baking for 25–30 additional minutes, or until a meat thermometer inserted into the thickest piece registers 165°F.


Pork Tenderloin with Dijon Gravy

Pork tenderloin is not only the most tender cut of pork, but it is also the leanest. Its mild flavor and lack of fat mean that you need to pair it with a powerhouse of a sauce, and that is exactly what you’ll find here. With only five ingredients, the Dijon sauce may seem simple, but it packs a punch of flavor and a little bit of heat as well.

Pork Tenderloin with Dijon Gravy
 
Prep time
Cook time
Total time
 
Author:
Recipe type: Everyday Meals
Makes: 4 Dinner portions
Ingredients
  • 2 teaspoons olive oil
  • 1 (16-ounce) pork tenderloin
  • ½ teaspoon dried rosemary
  • ¼ teaspoon salt
  • ¼ teaspoon pepper
  • ½ cup chicken stock
  • 2 tablespoons Dijon mustard
  • 1 teaspoon minced garlic
  • ¼ teaspoon dried thyme
  • 2 tablespoons butter
Directions
  1. Preheat oven to 450°F. Heat oil in a large skillet over high heat.
  2. Season all sides of the pork tenderloin with rosemary, salt, and pepper, and add to the hot skillet, browning on all sides.
  3. Transfer pork to a sheet pan, and bake for 12–15 minutes, or until a meat thermometer registers 145°F. Cover with aluminum foil, and let rest for 10 minutes before slicing thin.
  4. Meanwhile, return the skillet you browned the pork in to the heat, and add the chicken stock to deglaze, scraping any browned bits from the bottom of the pan.
  5. Add the Dijon mustard, garlic, and thyme to the skillet, and let the sauce reduce by about ⅓.
  6. Remove sauce from heat, and stir in butter until slightly thickened.
  7. Slice the pork tenderloin into 8-100 calorie slices. Serve each portion of the sliced pork drizzled with 1 ½ tablespoons of the sauce.
Perfect Portion Pork Tenderloin with Dijon Gravy

HELPFUL TIP: Whole-grain (sometimes labeled “coarse” or “deli”) mustard goes incredibly well in place of the Dijon in this sauce. It has a bit less spice than the Dijon if you want to keep things mild.
Serving size: ⅛ pork 11/2 tbsp gravy Calories: 100

 [/fusion_builder_column][/fusion_builder_row][/fusion_builder_container]

Pork Chops with Apples & Onions

Apples are a pork chop’s best friend, and everybody knows it. Though most people have served pork chops with applesauce at some point, large, tender slices of sautéed apple are an even better addition. Caramelized onions and seasonings bring savory depth to the dish, combining with the apples to make a warm slaw you serve piled right over each pork chop. Home cooking at its finest!

Pork Chops with Apples & Onions
 
Prep time
Cook time
Total time
 
Author:
Recipe type: Everyday Meals
Makes: 4 Dinner portions
Ingredients
  • 1 tablespoon olive oil
  • 1 ½ pounds, 4–6 ounce pork loin chops
  • Salt and pepper
  • ½ teaspoon thyme
  • 1 large yellow onion, thinly sliced
  • 2 apples, cored and thinly sliced (see tip)
  • 2 tablespoons butter, divided
  • ⅓ cup chicken stock
  • 1 tablespoon light brown sugar
  • 2 teaspoons cider vinegar
  • ¼ teaspoon ground mustard
  • ⅛ teaspoon ground allspice
  • 2 tablespoons chopped fresh sage
Directions
  1. Add the olive oil to a large skillet over medium-high heat, and heat until the oil thins and coats the skillet.
  2. Generously season both sides of the pork chops with the salt, pepper, and thyme.
  3. Place the seasoned chops into the skillet, and cook for 3–4 minutes on each side, until browned, and slicing into the thickest chop reveals no pink. Remove from skillet, and cover with aluminum foil.
  4. Reduce heat to medium, and add the onion, apples, and 1 tablespoon of butter to the skillet. Sauté for 5 minutes, or until onions are lightly caramelized.
  5. Deglaze the skillet with the chicken stock, scraping any browned pork and onions from the bottom. Once deglazed, add the brown sugar, cider vinegar, mustard, and allspice. Sauté for an additional 4–5 minutes, or until apples are tender.
  6. Remove the skillet from heat, and stir in chopped sage and the remaining 1 tablespoon of butter. Return the pork chops to the skillet, and cover with the apples and onions before serving.
Pork Chops with Apple & Onions

HELPFUL TIP: It is not necessary to peel the apples in this recipe. Not only does the final dish look better with the peel on, but there are tons of nutrients contained within that peel!
Serving size: ¼ pork chop Calories: 100

 [/fusion_builder_column][/fusion_builder_row][/fusion_builder_container]

Pulled Pork

Bob’s Farm to Table: Our Pulled Pork is made using lean pork tenderloin rather than the high-calorie pork shoulder or butt roasts used in most other recipes. We found that a gentle, lengthy cook in a slow cooker made the already tender tenderloin fall right apart, just like a barbecued fattier cut of meat would. Once the meat is pulled and tossed with sauce, you’d be hard-pressed to ever tell the difference. Serve as is over rice, or on slider or sandwich buns.

Pulled Pork
 
Prep time
Cook time
Total time
 
Author:
Recipe type: Everyday Meals
Makes: 16 Slider or 8 Sandwich portions
Ingredients
  • 1 tablespoon butter
  • 1 large yellow onion, diced
  • 2 teaspoons minced garlic
  • 1 teaspoon paprika
  • 2 pounds pork tenderloin
  • Salt and pepper
  • 1 cup beef broth
  • 1 batch Blue Ribbon Barbecue Sauce (see page 248)
Directions
  1. Place the butter in a large skillet over medium-high heat, and cook until melted.
  2. Add the onion, garlic, and paprika to the skillet and sauté for 3–4 minutes, just until the onions begin to cook down. Transfer the cooked onions to a slow cooker.
  3. Lightly season the pork tenderloin with salt and pepper, and place in the skillet, browning on all sides before transferring to the slow cooker.
  4. Pour the beef broth into the slow cooker, set the cooker to low, cover, and let cook for 8 hours.
  5. Drain the liquid from the slow cooker, and use 2 forks to shred the pork tenderloin. When you pour the liquid from the slow cooker, it is best to use a mesh strainer, saving any bits of meat and onion to add back to the pork.
  6. Fold the Blue Ribbon Barbecue Sauce into the shredded pork, set the slow cooker to high, and cook for 30 additional minutes before serving.
Perfect Portion Pulled Pork

HELPFUL TIP:
When you drain the liquid from the slow cooker, it is best to use a mesh strainer to remove the most liquid while saving any bits of meat and onion to add back to the pork.
Serving size: ⅓ cup Calories: 100

 [/fusion_builder_column][/fusion_builder_row][/fusion_builder_container]

Ground Turkey Bolognese

Bob’s Farm to Table: I love Bolognese sauce. Our version of this classic Italian meat sauce swaps healthful ground turkey in place of beef and produces unexpectedly bold flavors and a tender, silky texture. Starting the sauce with chopped carrots adds sweetness and earthiness to complement the tomatoes and the meat. This sauce is sure to become a family favorite! Serve over spaghetti, ziti, or penne pasta (each about 100 calories per ½ cup cooked).

Ground Turkey Bolognese
 
Prep time
Cook time
Total time
 
Author:
Recipe type: Everyday Meals
Makes: 6 Dinner portions
Ingredients
  • 1 tablespoon olive oil
  • 1 pound (93%) lean ground turkey
  • 1 yellow onion, diced
  • ½ cup finely chopped carrot
  • ¼ cup finely diced celery
  • 1 tablespoon minced garlic
  • 1 (28-ounce) can crushed tomatoes
  • ½ cup chicken broth
  • 3 ounces (½ can) tomato paste
  • 2 tablespoons chopped fresh basil
  • 2 teaspoons sugar
  • 1 teaspoon balsamic vinegar
  • 1 teaspoon Italian seasoning
  • ¾ teaspoon salt
  • ½ teaspoon pepper
Directions
  1. Heat the olive oil in a stockpot over medium-high heat.
  2. Brown the ground turkey until fully cooked. Add the onion, carrot, celery, and garlic. Sauté for 5 minutes, just until carrot begins to soften.
  3. Add the crushed tomatoes, chicken broth, tomato paste, basil, sugar, balsamic vinegar, Italian seasoning, salt, and pepper to the pot, and stir to combine.
  4. Bring to a simmer, reduce heat to low, cover, and let simmer for 45 minutes.
  5. Remove the cover, and simmer for an additional 10 minutes (to allow the sauce to slightly thicken) before serving.
Perfect Portion Ground Turkey Bolognese

HELPFUL TIP: Italian-seasoned ground turkey works great in this sauce, adding the fennel flavor you get in Italian sausage.
Serving size: ½ cup Calories: 100

 [/fusion_builder_column][/fusion_builder_row][/fusion_builder_container]

Lemon & Herb Roasted Chicken Thighs

We use a slew of fresh herbs and spices for our exceptionally moist Lemon and Herb Roasted Chicken Thighs. Not only is this recipe delicious, it’s a snap to cook, because we only have to monitor evenly sized chicken thighs rather than temping a whole chicken. We save calories by removing the chicken skin, but using the dark meat ensures that each piece is nice and tender. No question, this is our new go-to comfort roast chicken.

Lemon & Herb Roasted Chicken Thighs
 
Prep time
Cook time
Total time
 
Author:
Recipe type: Everyday Meals
Makes: 8 Lunch or 4 Dinner portions
Ingredients
  • 8 boneless, skinless chicken thighs (about 2 pounds)
  • 1 tablespoon butter, melted
  • Juice from 1 lemon
  • ½ teaspoon light brown sugar
  • 4 cloves garlic, sliced
  • 2 tablespoons chopped fresh thyme leaves
  • 2 tablespoons chopped fresh sage
  • 1 teaspoon lemon zest
  • ½ teaspoon Italian seasoning
  • ½ teaspoon salt
  • ½ teaspoon pepper
  • ¼ teaspoon paprika
Directions
  1. Preheat the oven to 425°F. Place the chicken thighs in a roasting pan.
  2. In a small bowl, combine the butter, lemon juice, and brown sugar, and then drizzle over the chicken thighs.
  3. Sprinkle the garlic, thyme, sage, lemon zest, Italian seasoning, salt, pepper, and paprika evenly over the chicken thighs.
  4. Bake for 20 minutes, or until a meat thermometer inserted into the thickest piece registers 165°F. Serve immediately.
Perfect Portion Lemon & Herb Roasted Chicken
Serving size: ½ chicken thigh Calories: 100

 [/fusion_builder_column][/fusion_builder_row][/fusion_builder_container]

Shrimp Scampi

Shrimp Scampi has become one of America’s most popular seafood restaurant dishes, though most people have no idea just how quick and easy it is to prepare at home. We sauté an entire julienned zucchini with the shrimp to turn this into a stand-alone dish you don’t even need to serve over pasta.

Shrimp Scampi
 
Prep time
Cook time
Total time
 
Author:
Recipe type: Everyday Meals
Makes: 6 Lunch and 4 Dinner portions
Ingredients
  • 1 tablespoon olive oil
  • 2 ½ tablespoons butter
  • 2 tablespoons minced garlic
  • 1 ½ pounds extra large raw shrimp, peeled and deveined
  • 1 large zucchini, thinly julienned
  • ⅓ cup dry white wine (see tip)
  • Juice of 1 fresh lemon
  • 2 tablespoons chopped fresh parsley
  • Salt and pepper
Directions
  1. Heat oil, butter, and garlic in a large sauté pan over medium-high heat, and bring up to a sizzle.
  2. Add the shrimp and julienned zucchini to the pan, and sauté for 1 minute, tossing to cook evenly.
  3. Add the white wine and lemon juice, bring to a simmer, and continue sautéing for 3 minutes, or until shrimp are pink on the outside and opaque on the inside.
  4. Remove from heat, toss with chopped fresh parsley, and season with salt and pepper to taste.
Perfect Portion Shrimp Scampi

HELPFUL TIP: Though white wine is traditional in a scampi sauce, you can substitute ¼ cup water and a tiny pinch of sugar, if desired.
Serving size: 3 Shrimp with sauce Calories: 100

 [/fusion_builder_column][/fusion_builder_row][/fusion_builder_container]

Shrimp & Grits

Classic Shrimp and Grits is an out-of-this-world meal for any time of day. Creamy cheese grits topped with a fresh tomato sauce studded with tender, flavor-packed shrimp and vegetables…what’s not to love? “Yellow grits” (not “quick cooking” or “instant”) are most often used in this dish and can usually be found in the organic grains section. That being said, you can also prepare this with the white “old-fashioned” grits sold in the breakfast aisle.

Shrimp & Grits
 
Prep time
Cook time
Total time
 
Author:
Recipe type: Everyday Meals
Makes: 4 Dinner portions
Ingredients
  • 4 cups water
  • ½ teaspoon salt, divided
  • ½ teaspoon pepper, divided
  • 1 cup stone-ground grits
  • 1 tablespoon olive oil
  • 1 ¼ pounds extra large raw shrimp, peeled and deveined
  • 1 cup diced yellow onion
  • ½ cup diced green bell pepper
  • 2 teaspoons minced garlic
  • 1 large tomato, diced
  • 1 tablespoon tomato paste
  • 2 teaspoons lemon juice
  • ½ teaspoon dried thyme
  • 2 tablespoons butter
  • ¼ cup shredded sharp Cheddar cheese
  • 2 tablespoons chopped fresh parsley
Directions
  1. In a sauce pot over high heat, bring the 4 cups of water, ¼ teaspoon of the salt, and ¼ teaspoon of the pepper to a boil. Add the grits, cover, and reduce heat to low. Let cook for 20–25 minutes, or until all water is absorbed.
  2. Meanwhile, start preparing the shrimp by placing the olive oil in a large skillet over medium-high heat.
  3. Add the shrimp, onion, bell pepper, and garlic to the skillet, and sauté for 2 minutes.
  4. Stir the diced tomato, tomato paste, lemon juice, thyme, the remaining ¼ teaspoon salt, and the remaining ¼ teaspoon pepper into the shrimp, and continue sautéing for 3 minutes, or until the shrimp are pink on the outside and opaque on the inside.
  5. Once the grits have finished cooking, remove from heat, and stir in the butter and Cheddar cheese.
  6. Serve the cheese grits topped with the shrimp and vegetables, sprinkled with the chopped fresh parsley.
Perfect Portion Shrimp & Grits

HELPFUL TIP: For a little heat, add a pinch of crushed red pepper flakes or a splash of hot sauce in step 4.
Serving size: ¼ cup Shrimp + 2 Shrimp Calories: 100

 [/fusion_builder_column][/fusion_builder_row][/fusion_builder_container]

Title

Go to Top